Showing posts with label Free pdf-pattern download. Show all posts

Apr 5, 2013

Rhythm of the Year Circle - Free PDF Download


Required Materials;

 - printer and paper to print the free PDF-pattern
(Free PDF-pattern  Dutch version)
- cardboard
- pencils, beeswax crayons or waterpaint
- split pin (linchpin)
- scissors
- non toxic glue
- optional; thread or ribbon

Inspired by Waldorf kindergartens I have designed a year wheel to visualize the rhythm of the year. The wheel consists of 2 circles. The smaller circle is attached to the larger one with a split pin. The small circle is divided into 16 parts: 12 parts for the months of the year and 4 parts for the 4 seasons. The child can rotate the wheel each month for a new month and/or season. Ideal for playful learning and homeschooling!


- After printing the free pattern you can let your child (or yourself) 
paint it with watercolours, wax crayons or pencils. 
- For extra hold, glue it on cardboard and cut it out. 
- Use a split pin (linchpin) to attach the smaller circle to the larger one. 
- Glue the arrow from the pattern on cardboard and cut it out. 
Decorate it and glue it on top of the larger circle. 
Make sure that it overlaps the smaller circle.
- Make a hole at the top if you want to put the year circle on the wall.


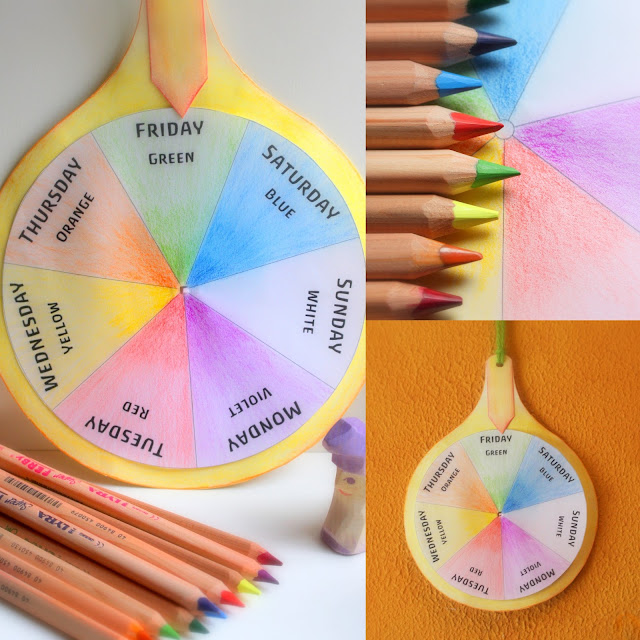
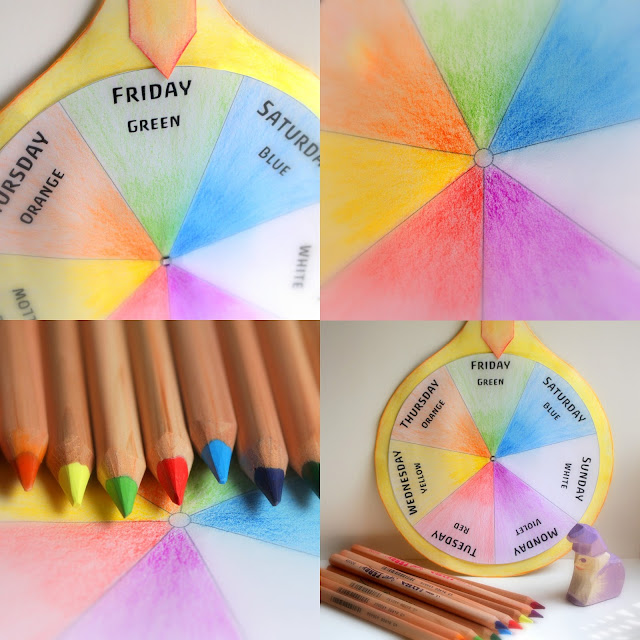
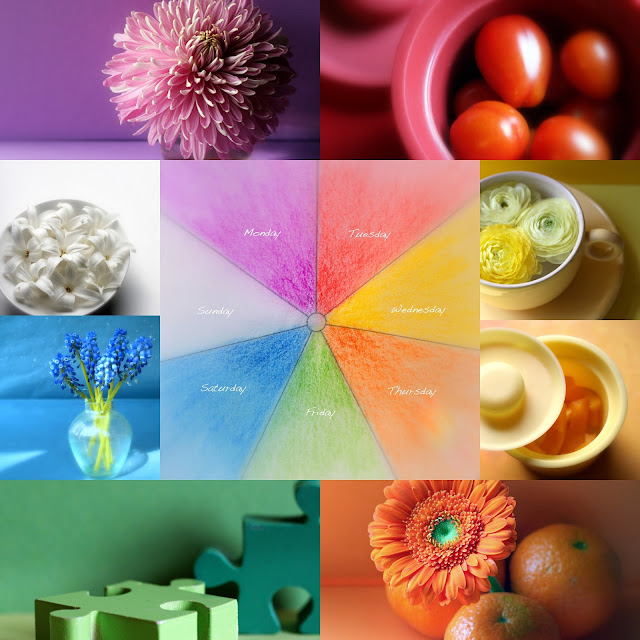
I also made a week circle, which you can download here.
(the Dutch version here)
It is a nice addition to this year circle.

Each new month and season is welcomed in our home with adjusting our seasonal table, singing songs and reading stories.


When you try to focus on a more natural and soulful life with your children by implementing daily, weekly and monthly rhythms throughout the year, you will discover how this ancient rhythm of life deeply nourishes your family life as well as your own personal growth.


Mar 22, 2013

Week Rhythm Colour Wheel - Free PDF-pattern download


Required Materials;

 - printer and paper to print the free PDF-pattern
- cardboard
- pencils, beeswax crayons or waterpaint
- split pin (linchpin)
- scissors
- non toxic glue
- optional; thread or ribbon

Inspired by Waldorf kindergartens I have designed a week wheel to visualize our week rhythm. The wheel consists of 2 circles and the smaller one is attached to the larger circle with a split pin. The small circle is divided into 7 parts, each part representing a day of the week with the corresponding colour for that day. The child can rotate the wheel each morning for a new day and thus learns the days of the week and their colours.


- After printing the free pattern you can let your child (or yourself) 
paint it with watercolours, wax crayons or pencils. 
- For extra hold, glue it on cardboard and cut it out. 
- Use a split pin (linchpin) to attach the smaller circle to the larger one. 
- Glue the arrow from the pattern on cardboard and cut it out. 
Decorate it and glue it on top of the larger circle. 
Make sure that it overlaps the smaller circle.
- Make a hole at the top if you want to hang the week circle.


Many ancient cultures believed that every day of the week had it's own corresponding planet, colour, scent and grain. This belief was adapted by Waldorf schools around the world;

Monday - Moon - Rice - Purple/violet - Jasmine 
Tuesday - Mars - Barley - Red  - Clove 
Wednesday - Mercury - Millet - Yellow - Copal 
Thursday - Jupiter - Rye - Orange - Cedar 
Friday - Venus - Oats - Green - Rose 
Saturday - Saturn - Corn - Indigo - Myrrh 
Sunday - Sun - Wheat - White - Frankincense


Following our week rhythm I try to dedicate each day to it's corresponding colour. There are all kinds of little ways to do this:

- A  table cloth in the colour of the day.
- A morning color walk looking for specific colored items.
- A small color arrangement on the coffee table
using flowers, gem stones, playsilks, small (Ostheimer) figurines.
- Snacks of fruits and vegetables in related colours.
- Coloured candleholders with a beeswax candle.
- A clothing detail like a scarf or a brooch.

I feel that focussing on the different colours like this actually intensifies my child's experience of the different days of the week and their rhythm.

Let me end this post by wishing you all a colourful week!


Mar 15, 2013

Tutorial Wee Felt Folk - Free PDF-pattern download


These lovely wee people I hold close to my heart. They have given me and my family so much joy and add some magic to our home. In almost every corner of our house you can find a little fairy scene and everyone who comes to vistit us is enchanted by them. So I warn you, once you get started....

Required Materials for 1 woodland wee person;

- pipe cleaners (1x 4.5 cm,  1x 5.5 cm and 1x 11 cm)
- 1 wooden bead 15 mm
- 2 wooden beads 5 mm
- wool felt scraps
- beeswax scrap
- tuft wool roving (for hair)
- mini tuft of wool roving or a thread of wool (for the shawl)
- scissors
- (embroidery) thread
- needle
- eco glue
- acorn cap or chestnut shell
- a copy of the free pdf-patterns (click here to download)


1 -  For the legs, cut a piece of pipe cleaner of 11 cm and fold it in half. You can use the ruler on the pdf-pattern for this.

2 -  For the arms, cut a piece of 5,5 cm and for the neck a piece of 4,5 cm.

3 -  Slide the piece for the arms between the legs and insert the piece for the neck on top.

4 - Wrap the legs around each other a few times so that a body is created and the arms and neck piece are tightly attached to the body. Fold one end of the neck upward and wrap the other side downward around the body.

The base frame is now ready!


5 and 6 - Cut the pattern for the trousers out of the felt (click here for the free pdf-pattern). Fold the trousers/legging around the legs and sew it close to the legs with a blanket stitch. You can tuck the trousers legs or otherwise cut them a bit shorter before you sew the trousers together.

7 -  Stitch for the zipper seam a on a and b on b and before you tie off, wrap the thread around the waist two times to secure the trousers. It is also possible to stitch the zipper seam first before you stitch the trousers, just see what works best for you.

8 - Choose a pattern from the pdf model A or B and cut the pattern for the jacket out of the felt. 

9 and 10 - Slide the hole on the neck and check if the sleeves fit the arm length. The arms should be a little bit longer than the sleeves so that you can attach the beads for the hands. Check if the arms are equally long and adjust if nescessary. Sew the outer edges under the sleeves and side of the jacket together with a blanket stitch. See the pdf-pattern for more details.


11 - Put some glue on the ends of the pipe cleaners at the sleeves and slide the beads for the hands on the pipe cleaners. Put some glue on the neck piece and slide the bead for the head on it. 

12 - Divide the piece of beeswax into two small pieces and shape them into little shoes (simple oval shape). Press the legs gently into the beeswax shoes.

13 - Glue a tuft of hair on the back of the head and glue the acorn cap on top of the head on the hair. Glue a tiny string of hair on the forehead and tie the ends of the hair into two pony tails. 

14 - Finally for the shawl, you role off a small tuft of wool between your fingers into a wire of about 6 cm long and wrap it one time around the head. If you want you can carefully cut some fringes on the bottom of the jacket of model A.

Enjoy your new friend!


I hope you will enjoy creating these tiny characters as much as I do, 

warm greetings sas


Related Posts Plugin for WordPress, Blogger...