Showing posts with label fairy gardens. Show all posts

Jun 7, 2013

DIY Fairy Gardening with Succulents


To me succulents are the ideal plants for creating fairy scenes. To use them in tiny fairy gardens you simply cut a few twigs and put them in water and in the sun. After a few days they will often root and you can plant them in a new fairy garden.


Last year on Pinterest I saw lovely terracotta flower pot fairy gardens. For these gardens I use broken terracotta flower pots, succulents and moss. Soaked soil can be used as modelling paste but afterwards the succulents don't need alot of water.
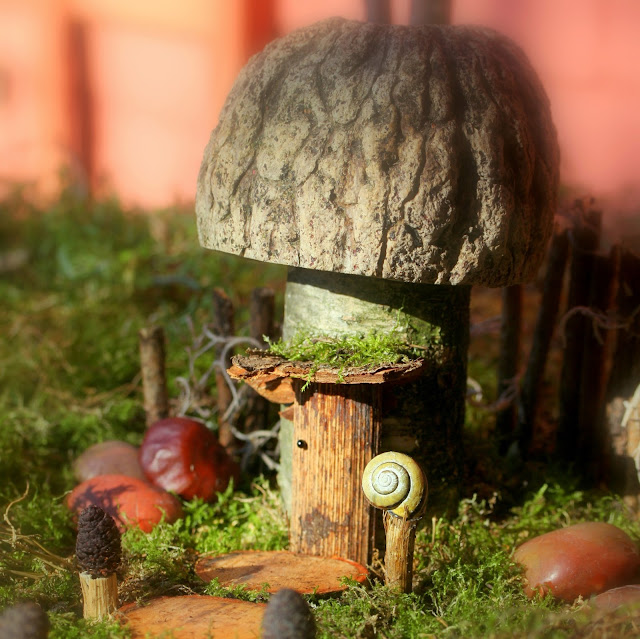
1 - Create a layer of stones on the bottom for drainage and fill 1/3 of the pot with soaked soil.
2 - Place a large potsherd as a wall in the middle of the pot and fill the space with soaked soil.
3 - Place small potsherds as the steps of the stairs in a half circle around the main potsherd.
4 - Fill the top of the flower pot with succulent plants and cover the dark soil with moss.
5 - Decorate the garden with tiny rooted succulents cuttings and all kinds of natural treasures.

- Update; for a more detailed tutorial visit the inspiring blog De Gulle Aarde - 


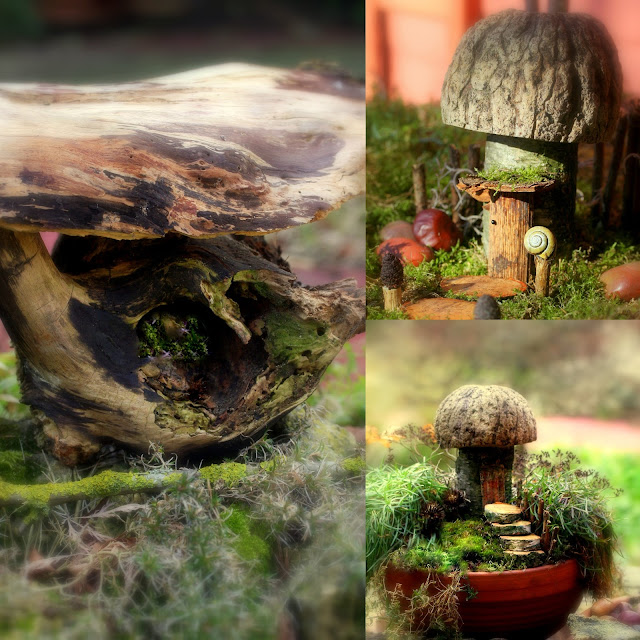
For this scene I simply used moss and a few rooted succulent cuttings to create a lovely moss terrace. I think it is important to use moss from your own garden and not to disturb or destroy the true fairy scenes in nature. It is easy to grow your own moss in a moist corner in your garden. 
1 - Collect moss and rooted succulent cuttings. 
Put a layer of gravel in a bowl and cover it with soaked soil.
2 - Make an arrangement of the succulents, leaving room for the terrace.
3 - Cover the soil with moss and add natural decorations.
5 - Garden furniture made of birch slices and willow branches makes a lovely fairy terrace!


 My favorite project so far are the fairy 'trees' in my front yard. I made them of tree root stumps with a succulent hat.
1 - Collect different (hanging) succulent plants and create a nest out of chicken wire. Place it on top of the tree stump and secure it. Fill the bottom of the nest with old newspapers and fill the nest with soaked soil.
2 - Cut holes in the wire and stick the plants into the nest.
3 - Finally cover all the visible wire and soil with moss and Spanish moss.


These fairy gardens are easy to create and to maintain and always attract the attention of people and fairies passing by!


Shared on;
The Magic Onions - Friday's Nature Table
Natural Suburbia - Creative Friday
Frontier Dreams - Keep Calm And Craft On
Like Mama Like Daughter - Eco-Kids Tuesday
Made by Joey - Sharing Creative Ideas

May 8, 2013

Guest Blog Magic Onions!


Today I am a proud guest blogger again at the lovely blog The Magic Onions !
For this heartwarming blog I have created a zen fairy garden.
I hope you will join me today and check it out! 

with love xxx sas


Apr 29, 2013

Nature Corner - In the Land of Merfolk


I love to create nature corners around the house with my son. He is the proud collector of the materials and I am the organizer. This corner is created after reading 'In the Land of Merfolk' by Daniela Drescher my favorite illustrator. It is so lovely to visualize a book together with your child simply using repurposed and natural materials and your imagination.


Required Materials;

- large bowl filled with water
- 2 (Mason) jars- terracotta flower bowl
  or a glass plate
- hot glue gun
- shell sand
- stones and shells 
- plants and flowers
- decoration like gemstones and baskets
- beeswax candle           


1 - Glue the terracotta or glass plate onto the bottom of the Mason jar and place it in the bowl.
2 - Surround it by stones. Decorate the top of the second Mason jar with shells, stones or wood using the hot glue gun.
3 - Fill the terracotta plate and the jar with shell sand and fill the bowl with water.
4 - Decorate with plants and flowers to create a magical scene.
5 - Finally light the candle and enjoy the scene reading a related story book.


A small scene like this one is a little world in itself, especially when you connect it to a story book or fairy tale. Make sure to engage your child in every step and you will be able to create something magical out of the most simple materials. Simply using gifts of nature, love and your imagination....


Shared on;
Frontier Dreams - Keep Calm and Craft On
Like Mama Like Daughter - Eco Kids Tuesday

Apr 18, 2013

Tabletop Fairy Garden


Our son is the very proud collector of the herbs and flowers for this tiny container garden. Making this little scene I noticed how lovely it is to dwell on the beauty of just single flowers.


The flower pots in this miniature flower display are made of half corks that I hollowed out and filled with floral foam. The flower stand is made of 3 pieces of wire of approx 10 cm long, twisted together. The ends are bent and decorated with wooden beads. To attach the cork pot, simply prick a hole in the corks with scissors.


Snail houses are excellent fairy vases. This piece is made of two slices of birch and 4 snail houses glued together. Simply fill the snail houses with a bit of water and some flowers.


By the way, walnut shells make lovely baskets and containers! Do not fill them with water though, that would make them crack. Enjoy!

Shared on;

Apr 15, 2013

Guest Blog Magic Onions!


Today I am a proud guest blogger at the wonderful magical blog The Magic Onions !
For this heartwarming blog I have created a fairy home decor.
I hope you will join me today and check it out! 

with love xxx sas


Fairy Party-Lights Tutorial


Fairies love to dance and on hot summer nights they dance until dawn. Lightened by the moon or lampions made of Physalis flowers. I thought I surprise them by creating some party-lights out of used Nespresso cups for their next dance event.

Required Materials:

- used Nespresso cups
- Christmas lights (string of 10 lights)
- scissors
- needle
- teaspoon
- acces to water
- a towel
- optional; hot glue gun


1 - Collect some Nespresso cups.
(in different colors)

2 - Cut the silver cap open with a pair of scissors.

3 - Use a teaspoon to remove the coffee-grounds.

4 - Rinse with water to clean the cup 
and dry it with a towel inside and outside.

5 - Prick with a needle a hole on top and use the scissors to enlarge the hole.

6 - Prick some decor on the side of the cups.

7 - Gently push the Christmas lights into the cups. Secure with a glue gun if you use the lights outdoors and use outdoors Christmas lights in this case.


Well, what do you think...isn't it romantic?
Sharing on;


Apr 11, 2013

Garden Gnome Reading Corner


After a hard day's work gnomes love to relax a bit in a comfortable reading chair. This one is made of 7 corks and a slice of birch of app. 6 cm. I used waterproof glue so rain is no problem (except for the relaxing gnomes maybe...)


The magazines are made of the water-repellent waxed paper of an used popcorn packaging. And the magazine rack is made of two walnut shells glued together. 
(Place the magazine rack in a windless spot) 


And last but not least...the coffee table. Any self-respecting gnome needs a decent coffee table and this lovely pebble model with a cork base is the latest trend. A pretty heavy model that does not blow away easily, ideal for the outdoors. 


This little project is easy to make (I use a small iron saw for the corks) and so much fun for children. And let's not forget the gratitude of the gnomes of course!


Sharing on;

Apr 8, 2013

Flower Fairies - Pussy Willow Fairy


Today I made this small flower fairy scene from a pussy willow branch. For the fairy I used my flower fairy pattern and I gave her a headdress made of pussy willows. The pussy willows are attached with sticky beeswax so I can easily replace them by other flowers. The base is made of an Ourico Pod (a coconut or small flower pot would work great too) filled with floral foam, and a dried birch bark surrounded by moss and spanish moss.


Every week I can simply change the scene by adding new flowers and creating a new flower fairy by changing her headdress. So simple and she looks just lovely on our dinnertable!

Mar 27, 2013

Garden Gnome Homes


When you are creating fairy houses and gnome homes every little piece of wood, moss or stone becomes a potential piece of furniture. Things will never be the same again.


Every morning when I look out of my kitchen window I see these little fairyland scenes. They make me feel happy...


.... very happy!

Mar 24, 2013

Fairy Vegetable Garden


For weeks I have been longing to start with the small container vegetable garden in our garden again. But it is still freezing cold overhere in Holland and I have to wait. 
In the meantime we enjoy our fairy vegetable garden.


Last week the lovely garden equipment for the fairies arrived and my imagination runned wild. Now our little friends have all the garden tools they need...except perhaps for a wheelbarrow.


These little scenes look so lovely on our breakfast and dinnertable!
In egg cartons we grow all kinds of sprouts.
And tiny baskets and buckets are filled with herbs and seasalt. 


All we need now are some wheelbarrows for the cherry tomatoes...


Joining Nicole on Keep Calm Craft On
Related Posts Plugin for WordPress, Blogger...