Showing posts with label fairy houses. Show all posts

Mar 15, 2015

Faerie Magic


...unicorn hair, mushroom and moss....
....magical forest treasures...
....once known now lost...


....star dust, amber resin..
.. and faerie lights....
....gathered during full moon's nights...

... create a powerful ancient spell..
... protect the forest....
... where faeries dwell....


Jun 21, 2013

DIY Flower Fairy Patio Set


Recently I discovered a delicious organic alcohol free apple cider and it even has a champagne cork! So finally I could make a lovely fairy chair like the ones I had seen on Pinterest. After that I became inspired and designed a matching patio table with a flower parasol.


Here is my simplified version of the chair, 
all you need is a wire cage from a champagne or cider bottle and a wire cutter;

1 - Cut the loop from the lower wire of the cage.
2 - Remove the wire completely from the cage leaving it in one piece.
3 - Shape a chair back by bending the wire.
4 - Twist the chair back onto the legs and trim excessive wire.
5 - Bow the end of the legs slightly.

Optional; you can remove the chair seat before you attach the chair back and replace it later.


For the patio table you will need:

- a wire cage 
- sharp scissors/knife
- wire cutters
- plastic or glass cap to use as a tiny vase
- a screw cap of 4 to 5 cm
- hot glue gun
- a flower with a long stem and water

 1- Cut the loop from the lower wire of the cage and remove the wire completely from the cage leaving it in one piece.
2 - Remove the seat from the wire cage. 
Prick a hole in the screw cap using scissors.
3 - Glue the wire cage to the bottom of the screw cap with a hot glue gun.
Glue the plastic cap in the center of the wire cage onto the screw cap, 
with the open side below the hole.
4 - Fill the plastic cap with water trough the hole in the screw cap.
Bow the end of the legs slightly and place a flower in the patio table vase.


 This makes such a lovely summer table decoration!
I hope you enjoy it and I wish you a lovely weekend.

Shared on;
The Magic Onions - Friday's Nature Table
Natural Suburbia - Creative Friday
Made by Joey - Sharing Creative Ideas
Frontier Dreams - Keep Calm Craft On
Like Mama Like Daughter - Eco-Kids Tuesday

Jun 14, 2013

Fairy Houses - DIY Milk Carton Flower Fairy Home


Yesterday I suddenly had inspiration to create a new kind of fairy house that could be used as a flower pot too. I'm very pleased with the result especially since I can finally recycle our milk cartons into fairy houses.


 Like always this is very easy to create!

1 - You need a used, well rinsed milk carton (the ones in Holland have a spout that can be used to water the plants).
2 - Prick a hole in the side of the carton with scissors and cut out 2 square windows. You can use the flaps to create shutters, but this time I just removed them.
3 - Fill the bottom with some soil and fill the carton with succulents till just above the square windows.
Optional; cut the support bar between the windows to easily fill the carton with plants. Later you can restore it when you cover the carton with barch.
4 - Cover the entire sides of the carton with barch and moss and create a barch roof using a hot glue gun. And finally decorate the house with pressed flowers, moss, snail shells and feathers.


These homes will attract the flower fairies of the plants that are growing inside.
Good luck and I wish you a magical weekend!
Shared on;
The Magic Onions - Friday's Nature Table
Natural Suburbia - Creative Friday
Made by Joey - Sharing Creative Ideas
Frontier Dreams - Keep Calm Craft On
Like Mama Like Daughter - Eco-Kids Tuesday

Jun 1, 2013

Fairy Houses - Fairy Bird House


Today I'm still having so much fun with my fairy bird houses made of egg cartons!
(click here for the complete tutorial)
                                                                                                    

They are ready in no time,so I can easily prepare some during nap time.
And while my toddler plays with all the lovely materials I decorate them.


For this one I used my beloved woodpecker feather that I found in our garden.
Together with some willow twigs, dried moss and alder clots it makes a lovely scene I think.


Of course these houses can be used by all kinds of tiny creatures. 
I wonder who will live here...


  Have a magical weekend! 

May 31, 2013

Fairy Houses - DIY Egg Carton Fairy Bird-Houses


My new idea of creating these fairy (bird-)houses made me so very happy this week! For a while I had been thinking about a way to recycle our empty egg cartons and then I came up with these bird-houses, that look lovely in all kinds of decorations like table pieces, trays with herbs and flower arrangements. They also make lovely ornaments.


Here is how you make them:

1 - Collect some egg cartons. 
I used a 6 piece egg carton and made 2 houses out of it.
2+3 - Cut the center cones from the egg carton, using scissors.
4 - Now cut the remaining cups from the egg carton. 
The same amount as the cones, 2 in this case.
5 - Glue the cones and the cups together.
6 - The 2 bases are now finished!


Now my favorite part starts... the decoration! I glued the houses on a stick first so I could paint them easily. I used water paint to paint the houses and moss and a small branch to finish them.


When you work with children you can prepare the houses in advance. Place the houses on sticks in a bowl surrounded by materials like water paint, glue, moss, small branches and snail shells. Then let each child paint and decorate their very own fairy bird-house.


The houses can be placed outdoors on a roofed terrace for example but they are not waterproof. Thanks to their size they look lovely anywhere in or around the house too and they also make lovely presents. I hope you enjoy these tiny houses as much as I do!


Shared on;
Natural Suburbia - Creative Friday
The Magic Onions - Friday's Nature Table
Made by Joey - Sharing Creative Ideas
Frontier Dreams - Keep Calm and Craft on
Like Mama like Daughter - Eco-Kids Tuesday

May 23, 2013

Fairy Houses - Moss Fairy House


This moss fairy house is a cosy and safe home 
to all the tiny magical creatures of the moss lands.


It is simply made of a toiletpaper roll base covered with bark and moss. 
You can find the photo-tutorial for the base here.
Once your fairy house is ready, glue it on a slice of birch
to keep the toiletpaper roll dry when you water the moss.


 By adding and changing small decorations like e.g. planters from snail shells
birch branch step stones and tiny ladders,
you can make the moss house an even more enjoyable place to be!
(and to look at from your couch of course! :)

Shared on;
Natural Suburbia - Creative Friday
Magic Onions - Friday's Nature Table
Made by Joey - Sharing Creative Ideas
Frontier Dreams - Keep Calm and Craft on
Like Mama Like Daughter - Eco-Kids Tuesday

May 18, 2013

Elf Tree House


Inspired by the lovely comment of Enchanted Schoolroom I created this elf tree house. It is made of a tree branch, moss, 4 terracotta water platters in different sizes and half a flower pot (I used a broke one and chipped the sides of with a hammer). With a hot glue gun I attached the branch to the platters and decorated it later with moss, furniture and a stairs out of birch branches. On top of the elf house there is a roof terrace with a garden.


A lovely elf staircase is easy to make. Use birch slices and glue them together with a hot glue gun. Start gluing from the point where you want the stairs to end, work in reverse from top to bottom for a natural curved tree stairs.

For the tree house I cut the branch in two pieces, 
a larger piece (2/3) and a smaller one (1/3) for on top. The large piece I cut from the bottom right and I attached it to the largest platter using a hot glue gun. I made sure it was stabile before attaching the other 2 platters to the branch.

Then I attached the smaller piece of branch to one of the platters and glued the last platter on top. The half flower pot was glued on the other platter and finally I decorated the bottom of all the platters with moss.


For the residents of the house; you can find the patterns and tutorial for the dolls here.

This tree house can be placed indoors or outdoors but beware with younger children because the terracotta platters can break. Instead of an elf house it also makes a lovely plantstand, nature table or a special tablepiece with flowers and candles. Enjoy!
Shared on;
The Magic Onions - Friday's Nature Table
Natural Suburbia - Creative Friday
Mabe by Joey - Sharing Creative Ideas
Like Mama Like Daughter - Eco-Kids Tuesday
Frontier Dreams - Keep Calm Craft On

May 10, 2013

Fairy Houses - Snail Shell Fairy House Tutorial


This week some neighborhood kids surprised me with a basket full of snail shells!
They asked me what I would make with all these shells and I told them that I would try to make another fairy house but this time a house for the Snail Fairy.


This fairy house is built exactly the same way as the cork fairy house but this time I used snail shells instead of cork slices. Finally I painted the shells with a non toxic coating to enhance the colours but you can also use olive oil. Don't oil them in advance otherwise the shells won't stick with the glue.

For the complete step by step photo-tutorial click here


The fairy houses are very light and easy to attach to any surface, this time I used dried bark. I'm in love with the soft tones and spiral forms of these snail shells, each one is unique... just perfect for a fairy house!


Have a magical day!

Shared on;
The Magic Onions - Friday's Nature Table
Natural Suburbia - Creative Friday
Made by Joey - Sharing Creative Ideas
Frontier Dreams - Keep Calm Craft On
Like Mama Like Daughter - Eco-Kids Tuesday

May 3, 2013

Fairy Houses - Cork Fairy House Tutorial


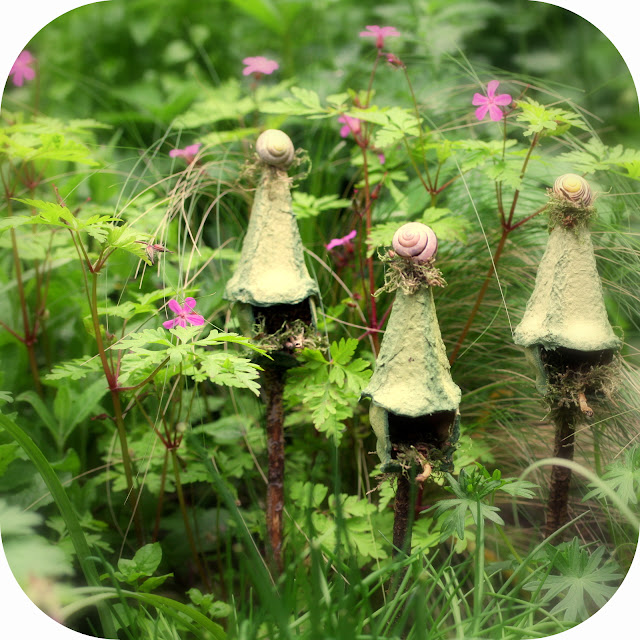
Our latest fairy house is made of a toiletpaper roll, sturdy paper and cork!
I'm very happy with the result because it is made of recycled materials, 
very light and easy to make even with children.
When you are working with children I recommend preparing the paper houses and corkslices in advance so the children can do the painting and decorating.

Here is my tutorial for you;


Required Materials;  
                                                
- Toiletpaper roll
- Sturdy paper
- Glue and optional a hot glue gun              
- Waterpaint (earth tones)
- Scissors and pen
- Small plate size app. 20 cm
- Corks
- Sharp knife or small handsaw
- Decoration like moss, birch bark,
   tiny branches and snailhouses
- Optional; materials for a fairy
   (felt, pipe cleaners, wooden beads)


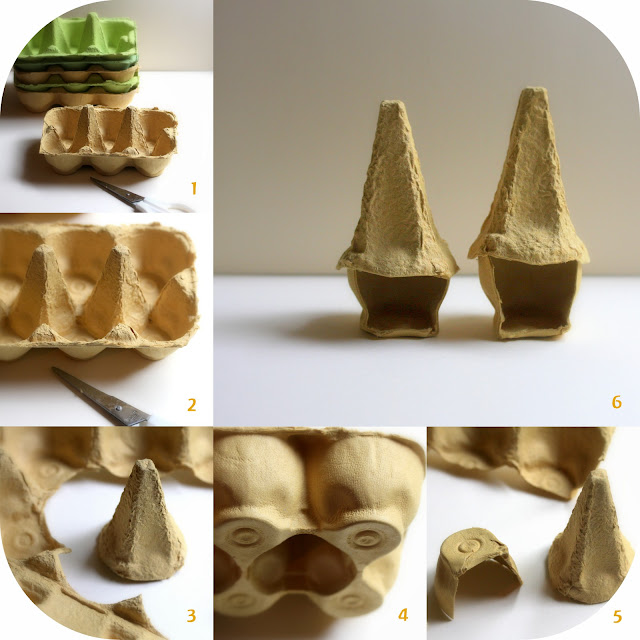
1 - Cover the toiletpaper roll with the sturdy paper.
2 - Fold the paper at the ends inside the roll.
3 - Create a circle on a sheet of the paper using the plate as a template.
     Cut it out with scissors and make a cut in the circle all the way to the center.
4 - Create a cone by overlapping the ends of the cut and secure them with glue.
5 - Glue the cone into the top of the paper roll.

These cute little paper houses can also be used for all kinds of different crafts,
 like covering them with fabric or hanging them by threads.


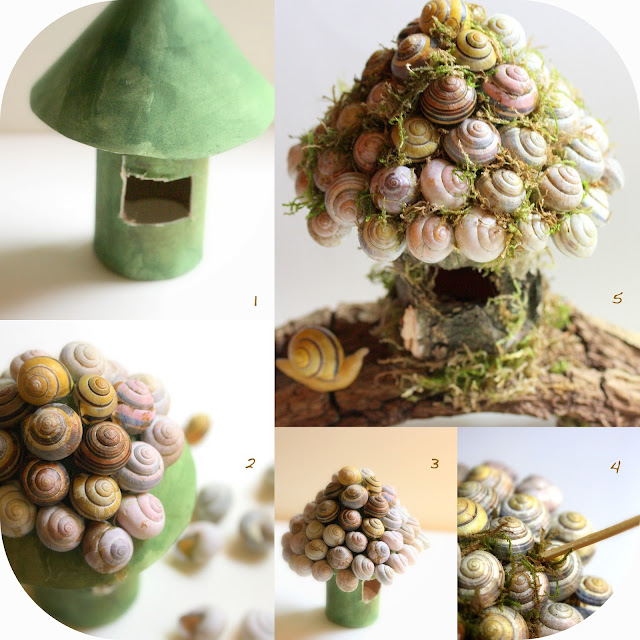
6 - Use a knife or a small handsaw to cut off slices of cork. At this point I started glueing the slices of cork onto the roof of the house, but later I realized that it is better to paint the house first. Let it dry completely and then start adding the corks.
7 - Start at the top of the roof with half slices and work your way down using whole slices.
8 - Now you can fill the cracks between the cork slices with dried moss.


9 - Add some glue with a glue brush and press a bit of dried moss into the cracks using a small stick or the end of a teaspoon.
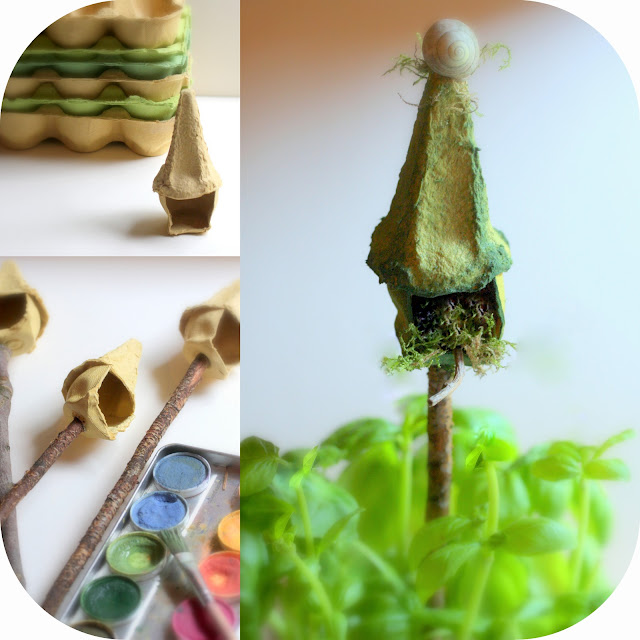
10 - For the window you can prick a hole in the paper roll and cut out a square with your scissors.
11 - Cover the window frames with bark and paint the inside of the rol in a warm fairy color.
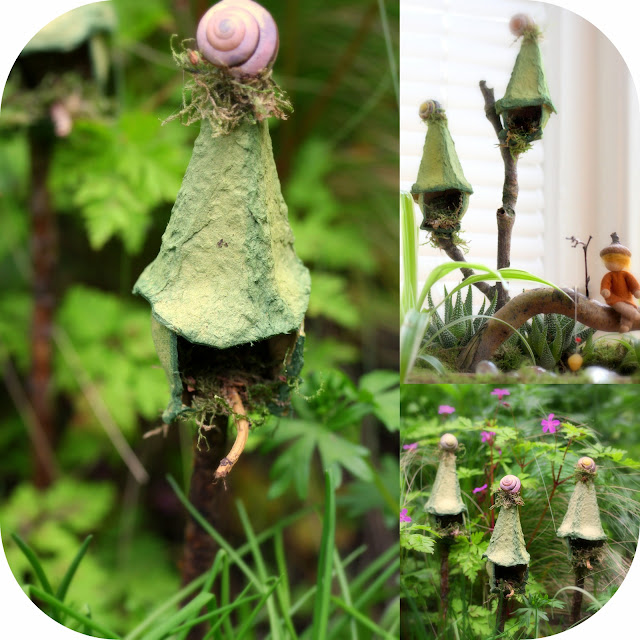
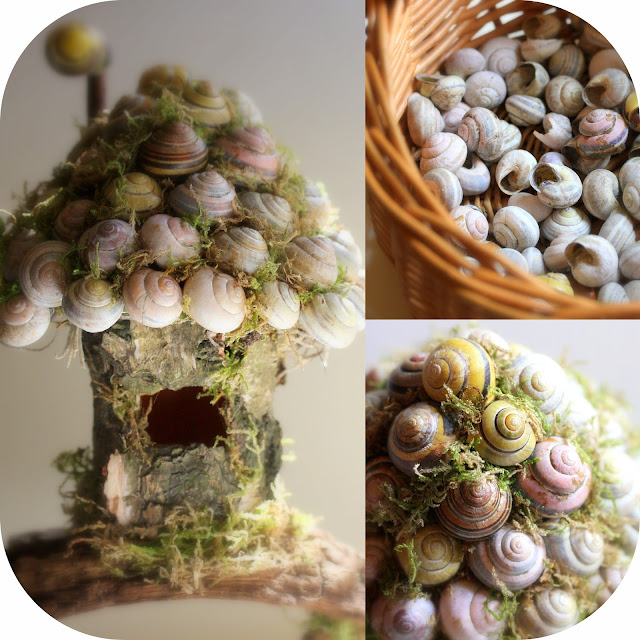
Finally you can create a chimney from a branch, bark and a snail shell.
12 - Optional; create a tiny fairy using this pattern or use another figurine to look out of the window. (I have painted the felt of this fairy afterwards with watercolor paint and a brush)


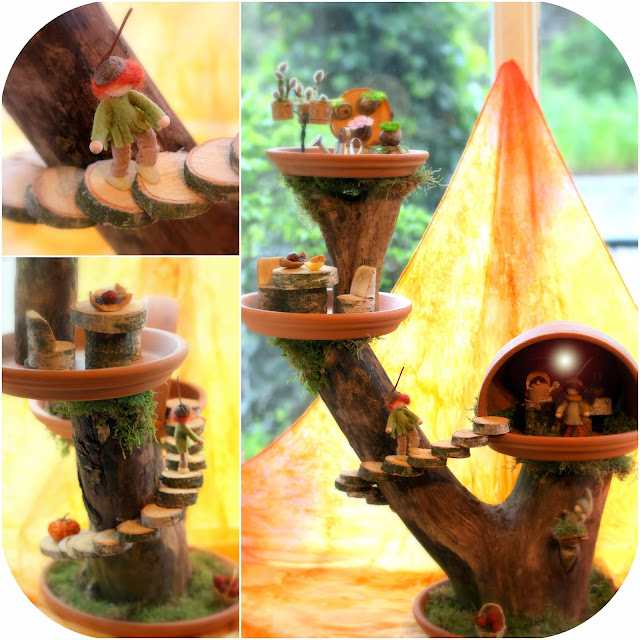
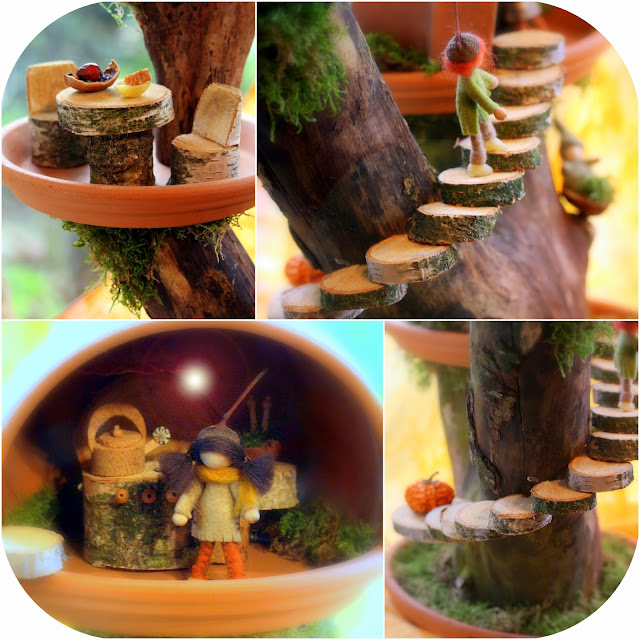
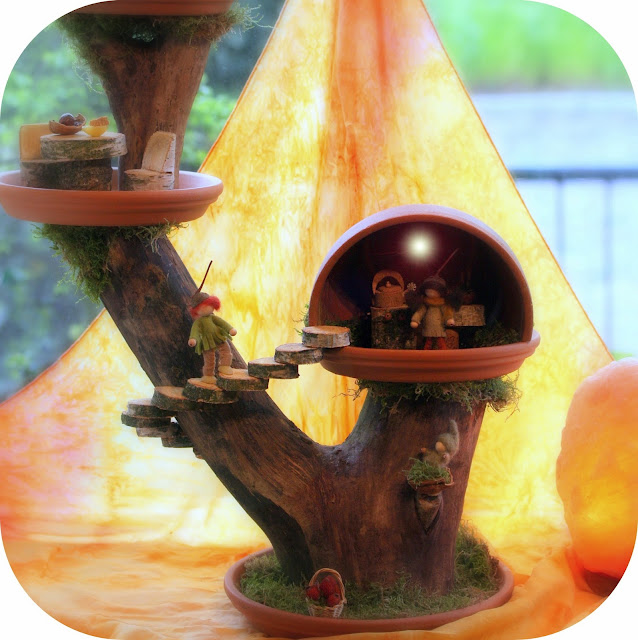
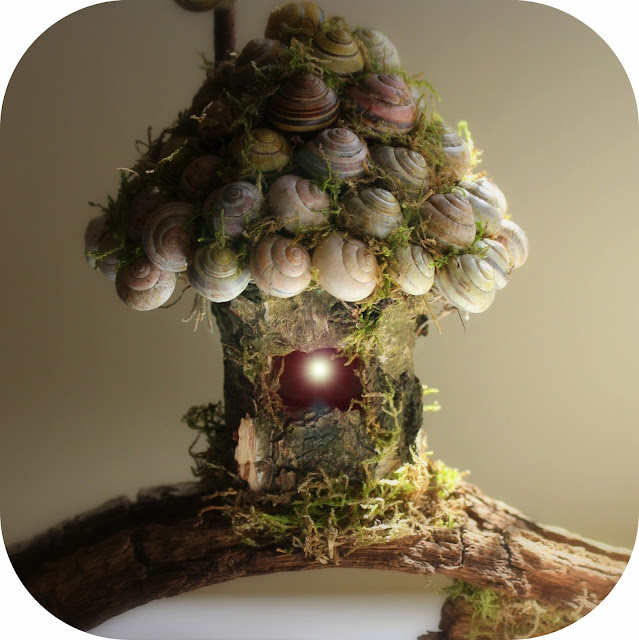
And there it is a new sweet fairy house! You can hang it or place it on a fairy 'tree' like I did. I used a thick birch branch of app. 25 cm long and 5 slices of birch and 5 corks to create this 'tree'. Using a hot glue gun I attached the slices of birch around the branch using the corks as crutches. Then I glued the branch onto a terracotta plate and decorated it with moss and birch.

In the evening when a small beeswax candle is burning in front of the fairy house it is simply magical!

Shared on;
The Magic Onions - Friday's Nature Table
Natural Suburbia - Creative Friday
Made by Joey - Sharing Creative Ideas
Like Mama Like Daughter - Eco Kids Tuesday
Frontier Dreams - Keep Calm and Craft on
Related Posts Plugin for WordPress, Blogger...