

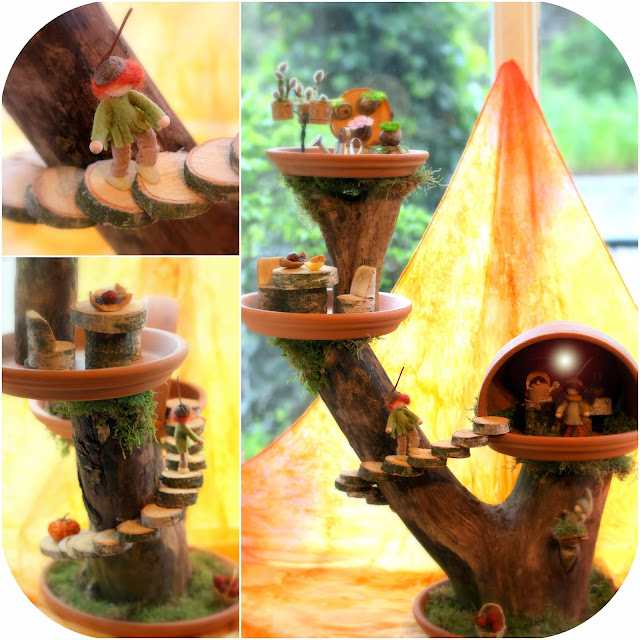
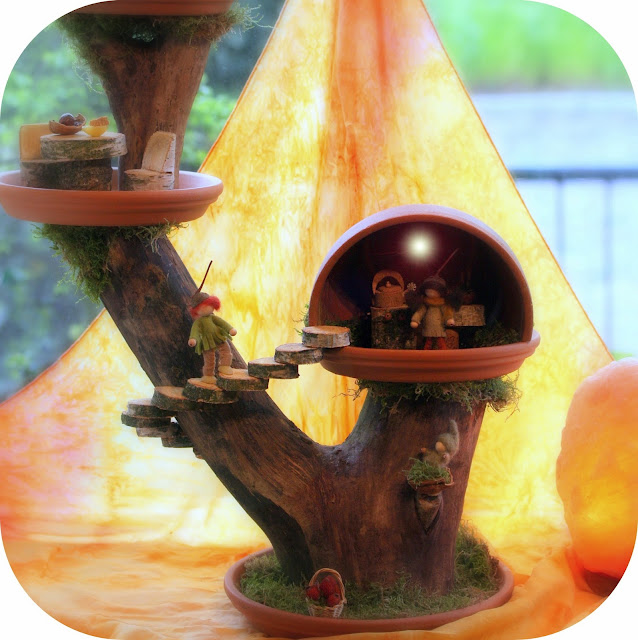
Inspired by the lovely comment of Enchanted Schoolroom I created this elf tree house. It is made of a tree branch, moss, 4 terracotta water platters in different sizes and half a flower pot (I used a broke one and chipped the sides of with a hammer). With a hot glue gun I attached the branch to the platters and decorated it later with moss, furniture and a stairs out of birch branches. On top of the elf house there is a roof terrace with a garden.
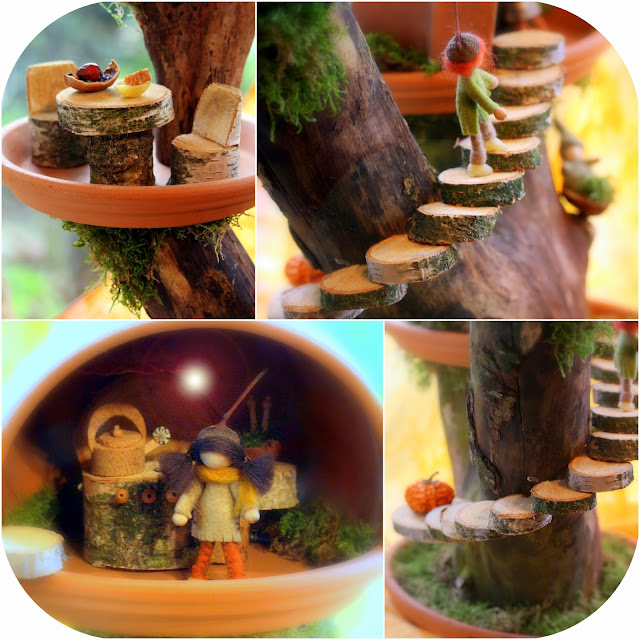
A lovely elf staircase is easy to make. Use birch slices and glue them together with a hot glue gun. Start gluing from the point where you want the stairs to end, work in reverse from top to bottom for a natural curved tree stairs.
For the tree house I cut the branch in two pieces,

 a larger piece (2/3) and a smaller one (1/3) for on top. The large piece I cut from the bottom right and I attached it to the largest platter using a hot glue gun. I made sure it was stabile before attaching the other 2 platters to the branch.
Then I attached the smaller piece of branch to one of the platters and glued the last platter on top. The half flower pot was glued on the other platter and finally I decorated the bottom of all the platters with moss.
For the residents of the house; you can find the patterns and tutorial for the dolls here.
This tree house can be placed indoors or outdoors but beware with younger children because the terracotta platters can break. Instead of an elf house it also makes a lovely plantstand, nature table or a special tablepiece with flowers and candles. Enjoy!

Shared on;
The Magic Onions - Friday's Nature Table
Natural Suburbia - Creative Friday
Mabe by Joey - Sharing Creative Ideas
Like Mama Like Daughter - Eco-Kids Tuesday
Frontier Dreams - Keep Calm Craft On
I love this so much! The gorgeous silk cloth and the wonderful tiny details give the house so much character.
ReplyDeleteMy curious mind has a question: how did you cut the pot in half?!
I look forward to seeing your creations each week thank you so much for sharing on my sharing creative ideas link up!
xoxo
~ joey ~
Oh, thank you for the lovely compliment Joey!
ReplyDeleteTo answer your question; I have used a broken flower pot and with a small hammer I have beaten off small pieces. The sides I later cleared and filled with moss!
Thank you for the lovely weekly linky party on your blog and have a great weekend,
xxx sas
Love love live it
ReplyDelete:) thank you Emma! :)
DeleteSo cute! I want to use some of your ideas for my little fairy garden. It is so much fun. Makes my happy to have a new hobby at my age (71)! Paty
ReplyDeleteThis makes me happy too. What a wonderful new hobby Patricia.
DeleteI just visited your blog and your fairy garden is just lovely!
Thank you for sharing and for your heartwarming comment,
warm greetings xxx sas
This is beautiful and very inspiring Sas :)....Vani
ReplyDeleteThank you Vani,
Deleteso nice to hear you like it :)
xx sas
Ooooh I love this! My little one would break the terra cotta in no time but maybe I will use sea shells...
ReplyDeleteSea shells sounds really lovely!
DeleteYou can use zinc platters or wooden cutting boards too,
Thank you for visiting Jennifer,
xx sas
Inspired!! You amaze me with you new creations each week :-)
ReplyDeleteSuch a lovely compliment,
Deletethank you :))
xx sas
Eres maravillosa!
ReplyDeleteTendré que pensar seriamente en hacer algo...
:)
Un beso!!!
You are wonderful!
ReplyDeleteI will have to think seriously about doing something ...
:)
So nice to see you here dear Remei
Deleteand thank you for the compliment :)
Sending you a hug from Holland,
xxx sas
Wonderful :) You are amazing :)
ReplyDeleteI am so happy I was able to inspire this wonderful creativity!
Now, all I need is a saw for making this adorable house, and of course, some convenient branches, lol!
I am beginning to think I am getting more into it than my kids, lol
Ha I also started out creating this scenes for my boy but now I have reached the point that I just admit I am doing it for myself really hihi
DeleteHave a lovely weekend and thank you,
xxx sas
i am loving this. we have those tree blocks and i am wondering if i could use those to do something similar?? hmmmm anyway yours turned out beautifully
ReplyDeleteI think three blocks will work just fine as long as they are not too small.
DeleteGood luck and I would love to see your elf house when it is finished!
Thank you for visiting,
Xxx sas
It's so beautiful.
ReplyDeleteThank you Andréann :)
DeleteGoodmorning! I'm so happy to find you!!!
ReplyDeleteYour blog is soooo perfect! You make wonderful things!
many kisses and a fairy-hug!
Oh, what a lovely way to start my morning!
ReplyDeleteThank you so much,
Xxx sas
Your whole blog is pure eye candy.
ReplyDelete